Blog

  • 50th Birthday Bash

    Last night I photographed probably THE best birthday party I’ve ever witnessed, and it was held in a really (really really) cool venue, The State Theatre in Falls Church. I had been to the theatre for a show several years ago, but I didn’t realize they also held private events. The space is amazing! It was perfect for a party, and it would also be really fun for a wedding reception.

    01_scott_party_blog02_scott_party_blog03_scott_party_blog

    But more about the party – seriously, it looked so fun. You guys, it was a costume party! So not only was it at this amazing venue, everyone dressed up. The costumes were incredible, and somehow I didn’t see very many duplicates. People were so creative! I don’t even know how anyone could decide who to vote on in the contest since every single costume was fantastic. 04_scott_party_blog18_scott_party_blog05_scott_party_blog06_scott_party_blog07_scott_party_blog08_scott_party_blog09_scott_party_blog17_scott_party_blog

    The guest of honor himself had FOUR costume changes! Side note: this was fun for me, because I hadn’t met him yet. So when I arrived, he was pointed out to me as the gentleman in the President Lincoln costume. Easy enough! Keep an eye out for the tall hat. But then after a while I didn’t see Lincoln anywhere, and I realized he was now Captain America! And there were two more costume changes! Now THAT is how you do a costume party.10_scott_party_blog

    The dance floor was full all night long…11_scott_party_blog

    …except when guests visited the photobooth provided by The State Theatre! So fun.12_scott_party_blog13_scott_party_blog15_scott_party_blog 16_scott_party_blog

    Seriously, it was the perfect party. Happy happy birthday, Scott! You sure do know how to celebrate! 🙂14_scott_party_blog

  • Hiking to La Mina Falls in El Yunque

    Our hike in El Yunque National Forest was one of my favorite days in Puerto Rico. Chris and I drove our little Fiesta to the park one morning with a plan to hike to the La Mina waterfall. When we arrived at the visitor center the skies opened up, so we quickly ducked inside to purchase ponchos for our visit. We wandered around some of the waterfalls that are right off of the main road, and also stopped to see the Yokahu Tower. Luckily it stopped raining not too long after we arrived.

    01_hiking_el_yunque_blog02_hiking_el_yunque_blog03_hiking_el_yunque_blog04_hiking_el_yunque_blog

    What we didn’t realize was that once we started hiking, it would be so humid that we wouldn’t be able to tell the difference from rain or no rain, and the plastic ponchos certainly weren’t breathable so we stuffed them into our pack and went on our merry way down the La Mina path. More than the ponchos, we were thankful to have good sturdy shoes because the trail is tricky in a few places. There are a lot of stairs and plenty of spots on the trail where the narrow path gets slippery, so best to leave your flip-flops for the beach and tackle this trail in trainers or other grippy shoes.

    05_hiking_el_yunque_blog06_hiking_el_yunque_blog07_hiking_el_yunque_blog

    At the very bottom of the trail (less than a mile one-way), La Mina Falls provides a refreshing oasis after a sweaty hike. Okay spoiler alert, the water was actually pretty cold! But it felt good on a hot day. It took us about 30 minutes to get down the trail to the waterfall – the elevation change is pretty steep so it’s not a quick mile.

    And again, the rocks here are slippery, so you’d do well to wear a pair of water shoes with some traction if you plan to climb into the water. We wore our swimsuits so that we could get right in, and then we pretty much just drip-dried on the hike back up. Don’t forget to take photos from the bridge!

    08_hiking_el_yunque_blog09_hiking_el_yunque_blog

  • Puerto Rico 2013

    Happy almost-end-of-summer! (It’s not officially fall until September 22nd, right?) Chris and I just returned from a sort of unplanned trip to Puerto Rico last week. I say “sort of unplanned” because I am an obsessive travel planner and I usually have trips booked or at least outlined a year or so in advance. We originally thought we’d drive to Toronto for the long Labor Day weekend, but we decided a few weeks ago that we could use a longer vacation. Being close and on a direct flight path from Dulles International Airport, Puerto Rico fit the bill. Plus, we found an amazing deal on flights + hotel through Travelocity. So off we went!

    We knew that we might run into some bad weather since it’s prime hurricane season, but we figured that staying at a huge resort hotel in the city would provide us with enough to do on a rainy day if needed. It turns out that a few of our booked activities did get cancelled due to a tropical wave that turned into a tropical storm, but we did have good weather most of the time and we found plenty of things to do.

    01_puerto_rico_blog 02_puerto_rico_blog03_puerto_rico_blog

    The second full day, we took our little green rental Fiesta and drove to El Yunque rainforest for some hiking. The waterfalls were amazing. We hiked the trail to Cascada La Mina, and even got in the water beneath the falls. It was cold! And a little scary – I couldn’t see what I was stepping on. 04_puerto_rico_blog05_puerto_rico_blog06_puerto_rico_blog

    That evening we headed into Old San Juan and took a ferry across the water to the Casa Bacardi rum factory. The tour was brief and we only saw a replica of the distillery process, but there were free drinks at the end! 07_puerto_rico_blog

    Because our sail/snorkel trip was cancelled, we were able to spend a little more time exploring Old San Juan. What a cute city! The buildings are so colorful with ornate details. I took several new images for my collection of door photos.08_puerto_rico_blog09_puerto_rico_blog10_puerto_rico_blog14_puerto_rico_blog

    17_puerto_rico_blog

    16_puerto_rico_blog

    We toured the two castles in the city, Castillo de San Cristóbal and Castillo San Felipe del Morro, and enjoyed learning about the history of each. We may also have played House Hunters, saying things like, “This is a great space! It has good light, and plenty of room for a king size bed. Oh, here’s where we could put our office…” 13_puerto_rico_blog12_puerto_rico_blog11_puerto_rico_blog

    The last full day of our trip, we drove to Seven Seas Beach and spent the afternoon snorkeling right off the shore. It was definitely my speed – I like when I can just pop out of the water if when something freaks me out. Thankfully all of the fish were the friendly kind, although I did see my first spiny black sea urchin! I forgot to photograph or video it, you know, on account of being scared of it. I’m getting a little more brave each time I go snorkeling though, I promise. I’m not committing to it, but I may even try scuba diving soon.  15_puerto_rico_blog

    Puerto Rico 2013 from Susan Marks on Vimeo.

  • Adventures in Pinterest-Land: DIY Drum Shade

    Adventures in Pinterest-Land: DIY Drum Shade

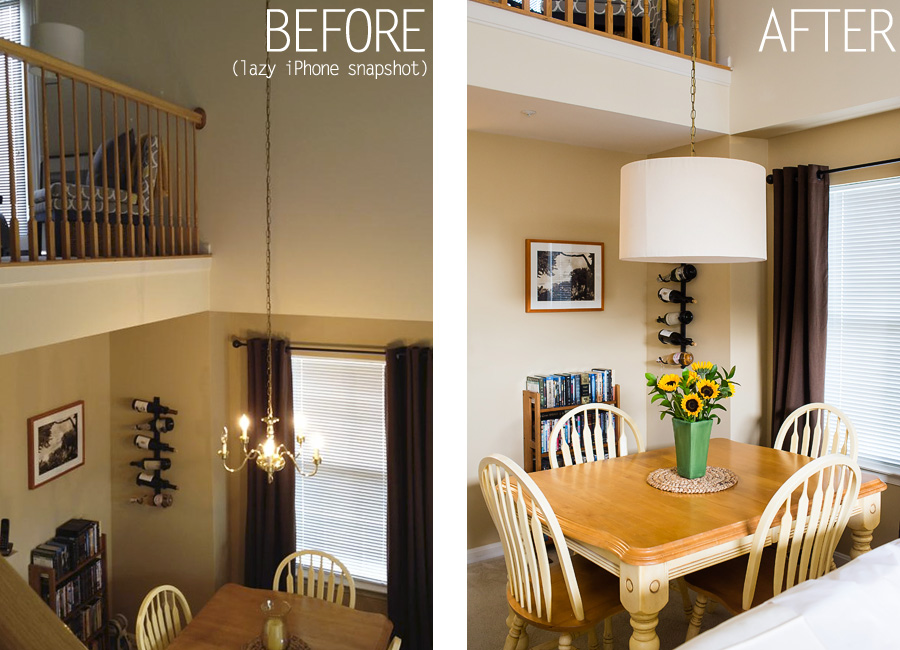
    Chris and I have lived in our townhouse for over seven years now – it’ll be eight in October! Incoming cliché: I can’t even believe how fast time flies. And in those 7+ years, we’ve been staring at this builders-grade brass chandelier above our dining room table. Well, not continuously staring, but still. Every time I see it, I feel brassy sadness. But alas, we (meaning me, really) haven’t found another fixture that we I love. It has to have a ridiculously long chain/cord, so that narrows our choices down unless we want to have something rewired (which I’m willing to do if I found the right fixture).

    01_chandelier_shade_blog

    For perspective, here’s a really old photo I took before we moved in when we were house-hunting. (Aw, memories!) See how the chandelier is installed on the vaulted ceiling? Well, it’s cut off in the photo, but you can hopefully picture it. I have been dreaming of at least painting the fixture with oil-rubbed bronze spray paint, but as you can imagine, getting it down and putting it back up would require a really really tall ladder and some nerves, so we just haven’t tried it. I contemplated spray painting it right in place with drop cloths over everything, but that’s risky, too. I’m sure I’d get paint everywhere. I can’t even brush my teeth without making a mess.02_chandelier_shade_blog

    So I continued to hunt for the perfect dining room lighting. I love the look of the oversized drum shades that I’ve been seeing everywhere. I have been staring longingly at these photos (found on houzz.com):03_chandelier_shade_blog

    And I even found a lamp at west elm that I really liked, but it’s a single-bulb fixture and I was worried it wouldn’t give off much light.  westelm

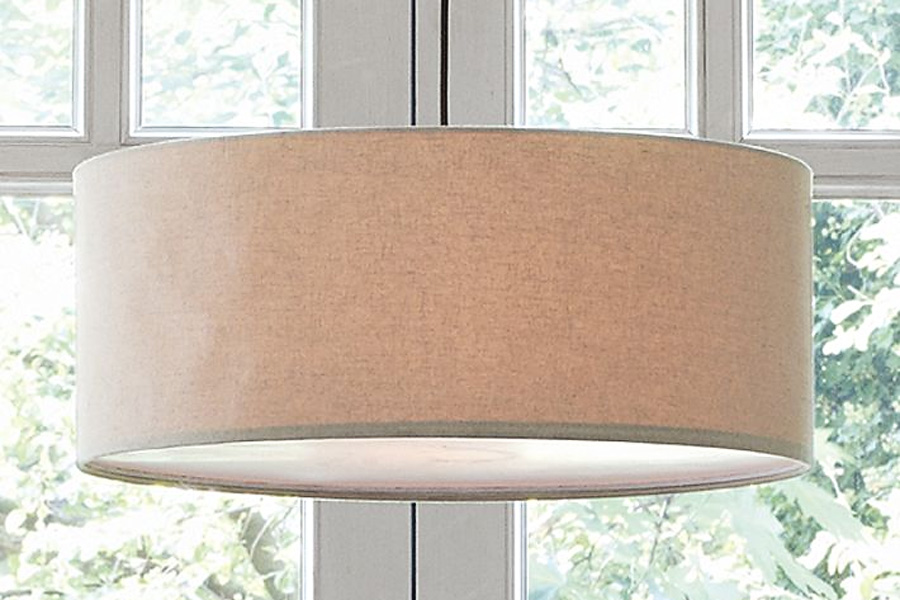
    I actually bought it hoping to just plop the shade over our existing fixture, but the shade was a little too shallow and wouldn’t completely hide our little brass monkey.

    Enter Pinterest and its glorious wealth of inspiration. I saw someone else pin a few tutorials on how to make your own custom drum shade – perfect! I read through a few of them and decided to give it a try. I mostly followed along with The Keylor Family’s tutorial and made a few adjustments of my own.

    Here are my supplies, pretty much the same as the other tutorials out there – two 23″ quilting hoops, two acrylic panels, fabric, glue gun/sticks (not pictured), and hanging hardware. I wanted a light neutral color, so I decided to go with a fairly stiff canvas fabric so that it would be opaque enough to mostly hide the shadows. I chose a white rip-stop nylon for the diffuser panel underneath because I liked that it was very sheer but also sturdy. I also decided to use eyelet screws and picture-hanging wire to hang the shade.

    04_chandelier_shade_blog

    I didn’t have a special tool to cut the acrylic panels (found at Home Depot – they’re the covers for fluorescent ceiling lights) so I just used scissors and manhandled my way through after measuring them for my hoops and for the depth I wanted to cover the entire fixture. The panels actually chipped and splintered quite a bit, so after a minute of cutting I decided I better wear glasses. Safety first, yo!05_chandelier_shade_blog

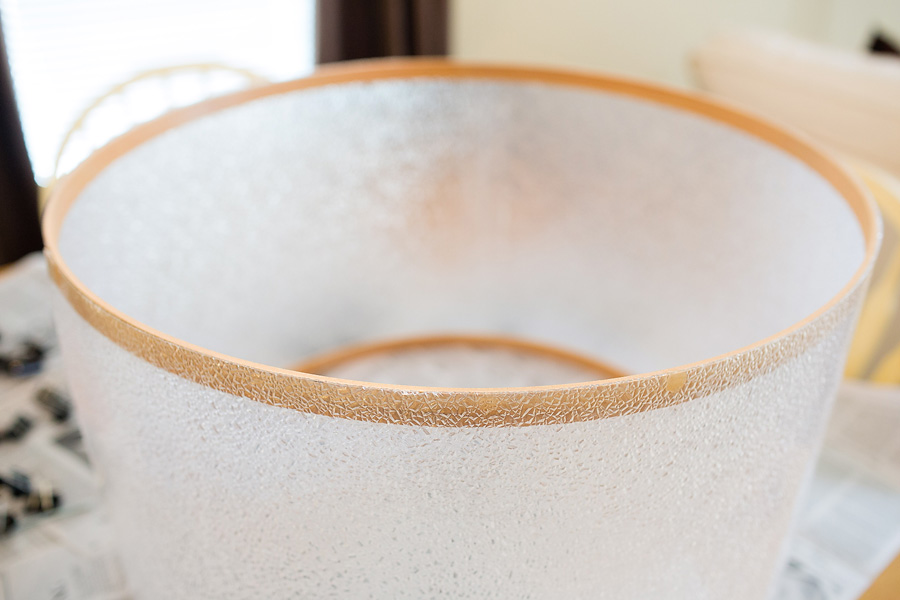
    Once I had the panels cut to size, I wrapped them around the inner rims of the two quilting hoops (hang onto the outer rims – you might end up using one like I did), and held it all together with a bunch of binder clips.06_chandelier_shade_blog 07_chandelier_shade_blog

    Then, with my trusty glue gun I worked my way around the edges with beads of glue in between the hoop and acrylic panel, removing the binder clips as I went along. I actually cracked the acrylic at one point while trying to get my glue gun in between. I had a mini heart-attack, but it was okay. Try to be gentle, but if a crack occurs it will be hidden behind the fabric so no worries.

    Voila, the finished structure: 08_chandelier_shade_blog 09_chandelier_shade_blog

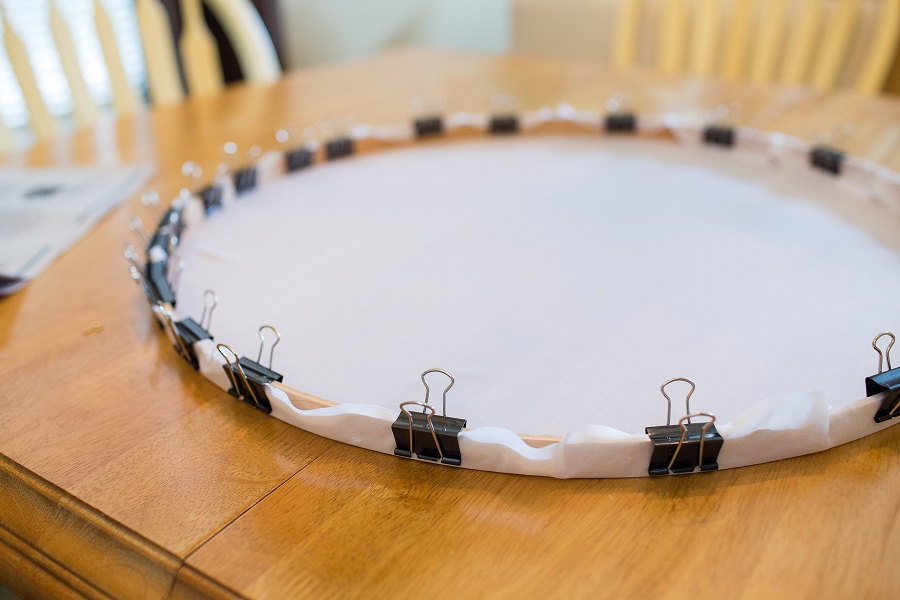
    Next, I measured my fabric – thanks to math, I knew I needed the diameter of the hoop multiplied by 3.14 (a.k.a. pi) plus a little extra to fold over as a clean seam. Go, geometry! I ironed my fabric first to get any wrinkles out and to press a clean folded edge on one side. Once my fabric was prepped, I used the wrap-and-binder-clip method to hold the fabric in place while I glued. Tip: pull and tug as you go along. I actually started with a bead of glue on one side, then went across to the opposite side and put a bead there, and sort of went in sections almost like cutting a pie from whole to halves to quarters, etc.

    After I glued all the way around, I realized I was left with some extra fabric that would show through on the edges when the light was on, so I went back and trimmed it with scissors.10_chandelier_shade_blog

    Still with me? Okay, so here’s the part where I got excited and forgot to take photos for each step. I liked the look of the rip-stop fabric for the diffuser panel, but gluing it into the inside of the shade like the Keylors did wasn’t working – I couldn’t get it taut enough and it was sagging. Thankfully I was able to pull it back out and come up with another idea.

    I grabbed the outer part of the quilting hoop, pried the wooden block adjusting things off using a butter knife and removed the staples. I put that ring inside the shade to determine what size would fit snugly, marked it, and then cut the hoop down and taped the ends together. Then, I wrapped the rip-stop nylon around again securing it with the binder clips, and was able to pull it so tight across that it was like a drum head while gluing.

    11_chandelier_shade_blog

    Super smooth! Next, I trimmed that excess fabric from around the edges. 12_chandelier_shade_blog

    I was able to place it right inside the shade (from the top-down). It was a perfect fit and I probably didn’t even have to glue it in place, but I did run a line of glue around the edges in between the two hoops just to add some reinforcement. Here’s the nearly-finished shade upside-down.13_chandelier_shade_blog

    To hang the shade, I installed four little eyelet screws into the top hoop. I actually used Chris’s drill to make a tiny pilot hole because I couldn’t get the eyelet screw to just screw into the wood. Then, I strung the picture hanging wire onto s-hooks and through the chain of our chandelier. It seems sturdy enough!  14_chandelier_shade_blog

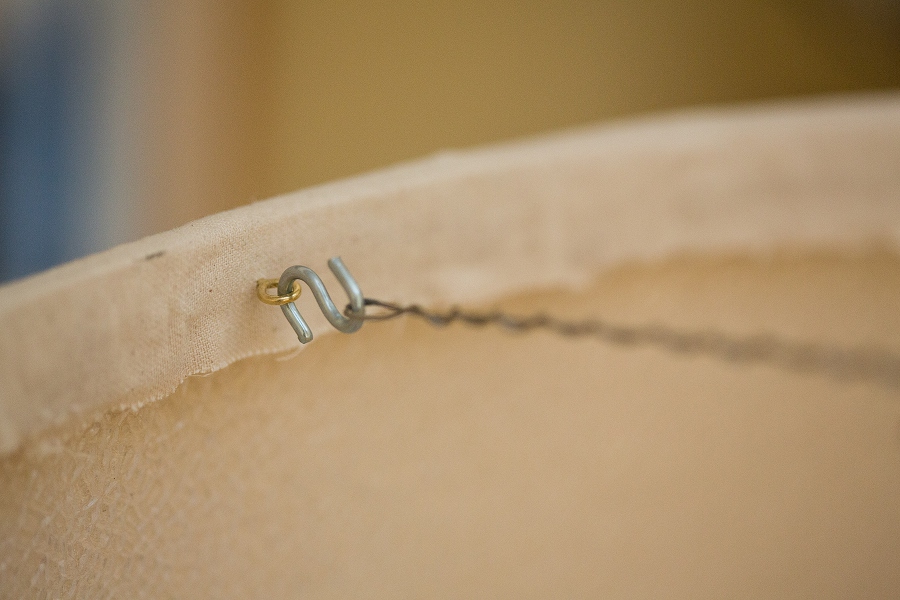
    And here’s the finished product! Ta da! Yes, I did go buy fresh flowers to celebrate. And I did a little dance.

    15_chandelier_shade_blog

    Here’s how she looks lit up in the evening. I can still see a little bit of the outline of the chandelier, but it’s not bad.16_chandelier_shade_blog

    And here’s a picture of the seam – I lined it up with one of the spots where the acrylic panels meet.17_chandelier_shade_blog

    I’m really happy with the way it turned out! The total cost was $43, and it only took about 4 hours. I’m calling this Pinterest project a definite success – this should tide us over until we find the perfect light fixture. Or we may just leave it up forever. Onto the next project!18_chandelier_shade_blog

    UPDATE 8/23: I’m not sure I would recommend using the nylon ripstop fabric for the diffuser panel. This morning it was a little bit wavy in some spots – the nylon seems to change with temperature, because when I turned the light on for a few minutes, the fabric eventually tightened back up. (Is this a “duh” thing that everyone else knows about nylon? I had no idea.) The wrinkles weren’t bad enough that it’s noticeable unless you inspect it, but it might be enough to bug me into trying to change it out. 🙂

    UPDATE 9/12: Oddly enough, the nylon fabric stayed tightened up and hasn’t wrinkled again after a few weeks now, so I’m happy with that choice. It looks really great.

    Let me know if you have any questions about any of the steps!

  • Adelyne

    Here’s something a little different on the blog today! I don’t usually do newborn photography since I prefer to leave it up to those who specialize in it (seriously, I know next to nothing about newborn babies!), but I couldn’t resist photographing my friend Coelle’s sweet new baby, Adelyne. She is absolutely precious and she loved the camera! Addie refused to nap, but not in a fussy way at all – I think she didn’t just want to miss out on any photo ops. A few times she couldn’t help dozing off for a minute or two, but most of the time she was wide-eyed and posing for me. Coelle and her hubby, Corey, are going to be the most wonderful parents, and I’m so incredibly happy for them!

    01_addie_blog 02_addie_blog 03_addie_blog 04_addie_blog 05_addie_blog