Category: house & home

  • Fun With Numbers

    Now that the holiday season is over and the recipient has received this gift, I can blog about it! I wanted to share this cute, easy DIY photo project that you can tailor to just about anyone:

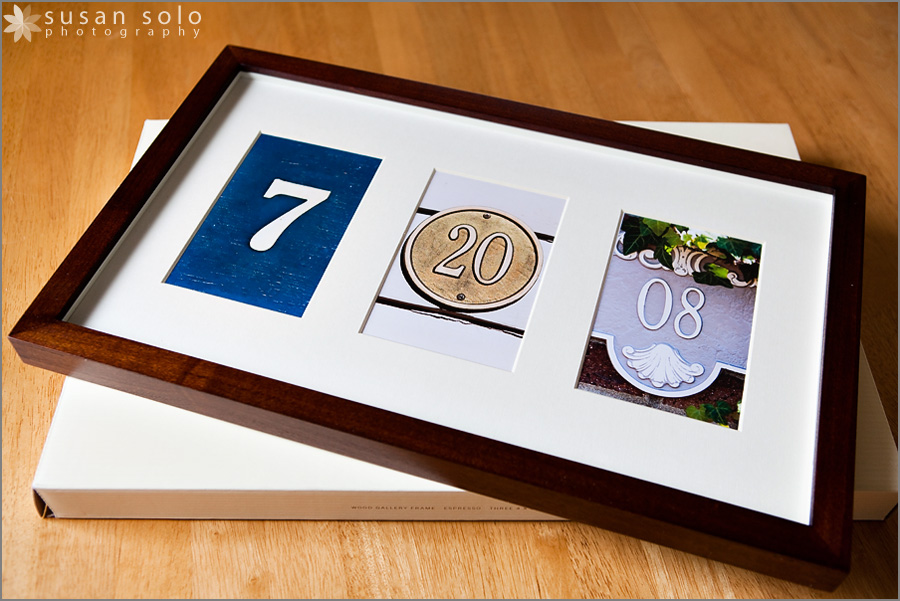
    It’s a framed date! Chris and I just took photos of found address numbers (these hail from various spots in Old Town Leesburg), and put them in a matted frame. There are companies that custom-make these for sale, but I think it’s way more fun to do this yourself, and it’s a totally simple but super thoughtful/personalized gift perfect for anyone. You can even do this project as a piece of art for your own home.

    First, start off with an idea of what occasion you want to commemorate: an anniversary, a baby’s birthday, a vacation date, anything! If you want to use the date only, you can easily find a matted frame with three openings for the month, day and year. (Or day, month, and year if you’re British.) I found this one with three vertical openings at Pottery Barn. If you want to do the date along with a special photo, you’ll have to search a little harder to find a pre-matted frame, but something with a configuration like this would totally work. Or of course, you can have your project custom matted and framed at a frame/art store. If you want to use a pre-matted frame, knowing the orientation of the openings in advance will help you to plan your photos.

    Next, grab your camera and head out on a scavenger hunt for your numbers! Note: If you are forgetful or easily sidetracked like I am, it’s best to write the date down so you know for sure which numbers are needed. Also, you don’t need a fancy camera for this project, but a long lens or a camera with zoom capability might help if your numbers are just out of reach so that you don’t have to trespass. And I knew that my frame had three vertical openings, so I photographed my numbers in portrait (vertical) orientation.

    Now, where to find these numbers? Old historic downtown areas have tons of interesting address markers on cute little storefronts and surrounding neighborhoods. Walk around and explore. It’s art + gift-giving + exercise all wrapped up into one! Take photos of the same number in different styles so that you can choose your favorites later. When you’re taking the pictures, try to fill the frame with as much of the number as you can, but leave enough of a margin on all sides in case your mat opening is not exactly 4×6 or 5×7, etc. You can always use software like Photoshop to crop the image when you’re ready to print. I happened to like the cheerful colors of the numbers we found so I left the images as-is, but you can also use software to convert the images to black-and-white for a clean and crisp graphic feel that is timeless and sure to go with any decor!

    And that brings us to the last step – just print your photos and arrange them in the frame! Be sure to use photo-friendly adhesives. I just used acid-free tape to mount the photos behind the mat and voila! Totally personalized custom artwork bursting with meaning. Easy enough, right?! So what date would you frame? Do you have any other fun photo projects to share?

  • Don’t DIY?

    I think I’m going to pitch a show to TLC or the DIY Network called Don’t DIY. The show will be about which home repair projects you should not attempt to do yourself if you lack the skills as I do, what it will cost you to have someone else do the repairs and clean-up for you after the job goes horribly wrong, and tips on how to fix small mistakes like paint dripping onto the carpet. An episode might go something like this:

    “Hi, I’m Susan with Don’t DIY. Today we’re going to discuss what might happen if you try to repair drywall holes on your own.”

    I just attempted to complete #71 on my 101 in 1001 list: sand and paint the unfinished wall in the office. Okay, it’s not really an unfinished wall, but when we had a ceiling fan installed a while ago (definitely NOT a DIY project!) they had to cut big holes in the wall to do the wiring. I used Home Depot for the job, and their contractors didn’t repair the holes that they created. They said that was someone else’s job?! But I figured it can’t be that hard, so I attempted it on my own.

    First, I bought some of those drywall patch repair kits, you know the little metal squares on a mesh backing? I was able to successfully apply those to the holes. That was the easy part – you just peel the sticker back off of the mesh and place it on the wall. Technically at this point the hole was gone and I was feeling pretty pleased with myself! However, I then had to wield one of those spatula thingies to apply spackle (the name escapes me at the moment – is it just called spatula?). Well, I’m not a spackling expert, and I applied it a little too thick. Which meant I needed to sand it down. My friend, Sam, who is a home DIY expert warned me that sanding it would get dust everywhere and that I should wipe away the excess with a damp cloth or something. I can’t remember. So I have thus confirmed that information by ignoring her warning and sanding down the little mounds of spackle. Yes, everything in my office is covered with a fine sprinkling of white powder indeed. Lovely! Not to mention I can’t seem to get the wall smooth – there are nice little holes and lines all over that refuse to go smooth.

    Then, in the process of painting over the spackle, I grew tired and frustrated and did a sloppy job of painting. I ended up flicking little spots paint all over the carpet. Note: This will be the comedic part of the episode, as my painting skills are definitely hilarious. I was using a paint brush to put paint onto a roller because I didn’t want to go through the hassle of using a tray and a liner. I’m currently working on getting the paint up by using Goo Gone. It seems to be sort of working.I think I’m probably going to have to hire someone to come out and get the wall done the way it should be finished. I don’t even want to attempt to finish the ceiling. If anyone local to me knows someone who does a great job with painting and repairing holes in drywall, please send me their contact info!

    And then maybe I’ll close out the episode by saying something like, “Thanks for tuning in to Don’t DIY! I’m Susan, and remember…if you don’t DIY, you don’t have to worry about screwing up!” What do you think? Would you tune in? I also have an idea for a how-not-to-cook show. I might call it Making a Mess and Burning Things with Susan.

  • Hang Drapes – Check.

    My outdoor portrait session for today had to be rescheduled because of the crummy weather we’re having, so instead I completed #40 on my 101 in 1001 list – hang drapes in the living room/dining room. Actually, Chris and I completed this task together. He did all of the handyman work, and I helped measure and sort of half-way ironed the panels before we hung them. My mom is much better at this stuff because she has the patience to do it right the first time. Me, I just sort of wanted to get them out of the packaging and up in any fashion, so they’re a little wrinklier than I’d like, but oh well. They’re up.

  • Let There Be Light

    We have light! Home Depot’s CDS electricians came out yesterday to work on our kitchen lighting, and they did a great job installing our new light:

    And we’re quite excited about that. Have you ever tried cooking in the dark? Well, okay…so I didn’t “cook” in the dark, but I did microwave a few things and maybe went as far as preparing a salad in the dark. It’s still hard! We’re happy to have the nice bright light again.

    They did say that this particular project was a little more complicated than usual, so I felt better about Chris and I giving up on the DIY effort.

  • "You Can Do It. We Can Help."

    Chris and I fancy ourselves DIY-ers for certain projects around the house. We have installed our own shelving in all of the closets, we’ve done all of the interior painting so far, Chris installed a digital thermostat, etc. We installed a gas range and hung the over-the-range microwave. We’re somewhat handy, so we thought installing a light in the kitchen shouldn’t be too hard. We finally decided to tackle the project today. Here’s the old fixture:

    Here are the necessary widgets for the new fixture:

    And here’s when we decided we needed to turn to a professional after realizing that we don’t have the same support-bracket mount as shown in the instructions. So our kitchen currently looks like this:

    So we called Home Depot. There’s just something about messing around with electrical installation that I’m just a little leary of, so no sense in risking it, right?